Wednesday, July 18, 2012

Fruit Salad


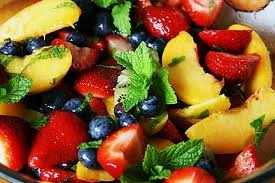
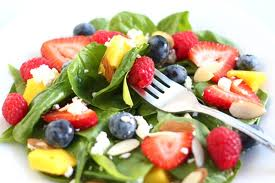
Fruit Salad is a general term referring to a fruit dish. There are a number of home recipes for fruit salad that contain different kinds of fruit, or that use a different kind of sauce other than the fruit's own juice or syrup. Common ingredients used in fruit salads include strawberries, pineapple, honeydew, watermelon, grapes, and kiwifruit. Various recipes may call for the addition of nuts, fruit juices, certain vegetables, yogurt, or other ingredients.

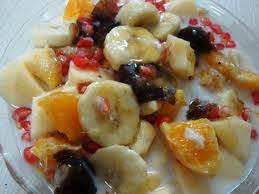
This dish is typically composed of an assortment of fruits served as is or combined with different types of sweet liquid and table cream. This can either be served as an appetizer, a side dish, and as a dessert.In the Philippines, fruit salad is considered to be more of a dessert rather than an appetizer or side dish.
"Fruit Salad" is also the name of a song by Australian children's band The Wiggles and on the television show Wonder Pets. Fruit salad was originally invented in Italy by Julius Ceasar.
"Fruit-salad" is also a slang term used for medals on a soldiers uniform, e.g. "Look at the fruit-salad on that colonel." The term refers to the bright colors of a high percentage of the ribbons that usually go with medals.

Ingredients

  • 1 can (large) fruit cocktail
  • 1 cup fresh strawberries, cleaned and cut in half lengthwise
  • 1 cup blueberries, cleaned
  • 3 pieces kiwi, cleaned and sliced into bite size pieces
  • 3/4 cups nata de coco
  • 14 ounces condensed milk
  • 8 ounces table / medium cream or all purpose cream
  •  
Derections:

1.Drain the juice from the fruit cocktail and transfer the canned fruits in a bowl.
 
2. Combine the fruit cocktail, strawberries, blueberries, kiwi, and nata de coco then toss lightly


Add the condensed milk then mix lightly. Be extra careful so that the fruits will remain intact.


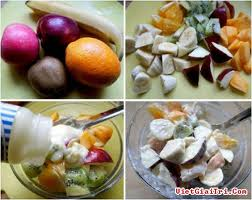
  1. Add the table cream / medium cream then mix again. Make sure that the cream is properly distributed amongst the fruits.

  1. Refrigerate for at least 3 hours.


  1. Serve Chilled. Share and Enjoy!
read more...

Lowfat Strawberry Banana Muffins


A healthier version of a favorite breakfast treat! Bananas and strawberries lend a natural sweetness to these delicious and moist muffins.
These did come out remarkably well for low-fat muffins.  They are a bit on the chewy side vs. crumbly, but the fruit taste is very strong, which makes them enjoyable.  When baking you really do have to test these with a toothpick in a few different spots.  The batter is bound to stay a bit gooey right next to the fruit, so make sure your muffins are cooked all the way!
Can low fat Strawberry Banana Muffins help you lose weight? Are some muffins better than others, and should some be avoided altogether? Are there things you can do to make your muffins work better in your weight loss program? The good news is, bananas are high in potassium and have plenty of fiber. They help keep your energy up. Low fat Strawberry Banana Muffins can help you lose weight, if you eat the right kind.
Now, i will tell you how make Lowfat Strawberry Banana Muffins!
Muffins are so easy to make and make it easy in the morning for a quick breakfast, so give these a try!
INGREDIENTS:
       2 c. flour
       1/2 c. brown sugar
       1/2 tsp baking soda
       1 tsp baking powder
       3/4 tsp cinnamon
       3/4 to 1 c. unsweetened applesauce (start with 3/4 C and add more, as necessary)
       1 1/2 tsp vanilla
       2 c. sliced strawberries
       2 mashed bananas
INSTRUCTIONS:
Mix all dry ingredients together.


(My mixture looked super dry, so I added in the extra 1/4 cup of applesauce.  All better!)


Fold in strawberries. (I sliced my strawberries rather large because I didn’t want them to be complete mush in the muffins.)


Divide into muffin tins. Bake at 350 for 20-25 minutes.

Bake until tops of muffins are firm and golden, about 20 minutes. Place on a wire rack and cool for 5 minutes. Turn muffins out onto rack and cool completely.

 
read more...

Sunday, July 15, 2012

Twice-Cooked Pork

Chinese name: 回锅肉 (huí guō ròu) 
Style: Sichuan (Szechuan) Cuisine 
Characteristics: Twice-cooked pork is red and green in color, rich in taste. The pork slices in it is fat but not greasy.


As the saying goes, if you haven't eaten twice-cooked pork in Sichuan, you haven't actually been to Sichuan, even if you have. Twice-cooked pork, sisiter dish of  Fried Pork with Salted Pepper,  is a traditional and popular dish in Sichuan. Almost every housewife in Sichuan can cook it. Nowadays, twice-cooked pork has been developed into a great variety according to different local flavors, but the way of cooking the pork is unchanged.
Twice-cooked pork is a Sichuan dish of fatty pork leg or belly, skin-on, that gets two very different cooking preparations. In the first stage, the belly is simmered just until it is cooked through. In stage two, you stir-fry the slices of belly until the meat is brown, the fat has rendered somewhat, and the layer of skin is a little crispy around the edges. Then you add to the wok what I think should be some kind of holy trinity of Chinese pastes: black bean, chili bean, and sweet bean.


Ingredients
 
Pork 200g
Garlic bolt 150g
Sichuan bean sauce 20g
Salt black bean 10g
Sweet paste 8g
Chicken powder 3g
Soy sauce 3g


Preparation
1. Bring 3/4 wok of water to a boil. Add in the whole pork butt to be boiled for about 3 minutes until 60% cooked, during which cooking wine, ginger and green onion sections can be added in to help to remove the fishy smell. Pick it out and put into a basin filled with cold water to be cooled for 1 minute. Remove it and cut into thin slices of 3-4 cm long and 1-2 cm wide. Put onto a plate. 
2. Wash the garlic sprouts. Pat the white stems on chopping board with kitchen knife until you feel the garlic smell. Cut into sections of 3 cm long. Put into plate.


Method:
Bring a large pot of water to boil. Add the pork and simmer until it is just cooked through, about 25 minutes. Remove the pork from the water and let cool. (Water can be set aside for use in stock, or discarded.) Place the belly in the refrigerator for an hour or more to firm up the flesh.


When the meat is cool, slice it thinly so you have 1/4-inch thick rectangles of meat.
Heat oil or lard in wok over medium-high heat until shimmering. Add the slices of pork and stir-fry until the fat has rendered somewhat and the skin is brown and somewhat crisp, about 2 minutes. Push the pork to one side of the wok and add the chili bean paste. Stir-fry until the oil is red, then add the sweet bean paste and the black beans and stir-fry for a few seconds longer. Mix everything together and add the soy sauce and the sugar/
Add the leeks or ramps and stir-fry until they are just cooked, about 30 seconds.
Finally, twice cooked pork is complete. Turn off the heat, remove it out of the wok and put into a prepared fine porcelain plate. Serve with rice.


Server immediately.


Tips: Besides garlic sprouts, dry cowpeas, chili peppers, pickles, cabbage, garlic stems can also be used as the fixings to go with pork in this dish according to your favorite.
read more...

Saturday, July 14, 2012

Mango shrimp salad

A fresh taste of summer -this salad is delicious served immediately at room temperature. It's even better after being chilled for an hour to combine the flavors.. Shrimp salad and mango will become a summertime favorite in our household. It's light and fresh but flavorful too.


Ingredients:
  • 2 cups mixed greens
  • 1 cup cooked shrimp, chopped
  • 2 limes, juiced
  • 1/2 mango, chopped
  • 1 tsp shallot, chopped
  • 2 tsp cilantro
  • 3 tbsp olive oil
  • Salt and pepper to taste
  • Small bowl
  • Large bowl
  • 2 mixing spoons
  • Plate for serving

Serves: 4
Active Time: 25 mins
Total Time: 30 mins
You are gonna do some chopping.
Peel and slice mango. Squeeze the juice from the lime and toss with the mango.


Peel and slice jicama and cucumber into strips. Thinly slice the radishes.

Combine green onions, lime juice, fish sauce, sugar, garlic, and green chili in a bowl. Mix in shredded mango.

You’ll want to defrost the frozen shrimp. You should rinse it with water & drain them in a colander. The shrimp go into a non reactive bowl (unlike this one!) with a LOT of lime juice. Now it goes into the fridge. Thread shrimp onto skewers, piercing once near the tail and once near the head. Lightly oil grill grate. Cook shrimp on preheated grill for 2 to 3 minutes per side, or until opaque. Coat shrimp with Cajun seasoning and quickly pan fry in oil until just cooked (pink).

To assemble the salad, tear the lettuce into bite-sized pieces before washing it. Cut the stems off the watercress and discard any damaged leaves. Wash the lettuce and watercress in cold water. Spin dry and place into a large serving bowl. Set aside.
Peel and dice the mango. Finely chop the mint and dill and add everything to the lettuce.
Top with shrimp and drizzle with dressing. For the shrimp, check for any bits of shell that may have been missed and add to the salad. Drizzle a bit of the vinaigrette over top. Gently toss and serve.
Dressing

Whisk egg yolk gradually adding vinegar and lime juice. Whisk in canola oil until well incorporated.
Add other ingredients and shake well. (Keep refrigerated)
This light, summery salad is fabulous on its own but accompanies roasted chicken or grilled fish very well.

Notes:
For the shrimp, try to buy fresh, hand-peeled shrimp, rather than machine peeled. Avocados are also really nice in this salad. Just make sure you don’t cut them until you are ready to assemble the salad or they will oxidize and turn brown.
read more...

Friday, July 13, 2012

Steamed Shrimp Rice Cakes


The traditional Steamed Shrimp Rice Cakes are made with Rice Flour, shrimp, wrapped in phrynium leaves and served with fish sauce. Most fresh shrimp must be soaked for several hours until soft and then grounded finely in a blender. After added salt, sugar and fish sauce is stir-fried until dry and having a sweet and salty taste.
The rice batter, made of rice flour, should be smooth and soft. Next, fried shrimp is spread on the top of the rice batter, and the whole is wrapped into a rectangular shape and steamed for about 15 minutes.It is the time to take off the cover and sniff the elegant scent of phrynium leaves. The shrimp is crispy, a bit greasy, sweet and salty in a nice way that most people are inclined to savor it gradually, and it is mixed so well with the rice batter that it tastes great on its own and even better with the sweet and spicy fish sauce.
Now, I will give you the way to make Steamed Shrimp Rice Cakes.

Ingredients
  • DIPPING SAUCE:3 tablespoons sugar
  • 1/2 cup prawn broth
  • 3 tablespoons fish sauce
  • 2 tablespoons vinegar
  • 2chiles, chopped
  • 3 1/2ounces/100 g rice flour
  • 1tablespoon/15 g tapioca flour
  • Salt
  • 1 cup lukewarm water
  • 4 teaspoons vegetable oil, for batter
  • 14ounces/400 g small tiger prawn
  • 3cloves garlic, finely diced (1 tablespoon)
  • 1 tablespoon finely diced red shallots
  • 1/2 teaspoon black pepper
  • 1 cup pork crackling, crushed
  • Special equipment: 20 small ramekins
Directions
For the dipping sauce: Add sugar, prawn broth, fish sauce, and vinegar to a bowl. Mix until the sugar is dissolved. Now add the chopped chile. Set aside.


In a large bowl combine rice flour, tapioca flour, and 1/4 teaspoon salt. Make a well

in the center and pour in 1/2 the warm water.

 
Using your hands stir the ingredients together kneading the dough until it is well combined. Now add the rest of the water, use a wooden spoon to stir it all together until you achieve a fine liquid batter.

Add 2 teaspoons vegetable oil and allow the batter to rest for 15 minutes.


Bring a pot of water to the boil, add prawns and cook for 5 minutes. Remove the prawns, peel and reserve the prawn broth.
 
Bring a steamer pot to rapid boil, place as many ramekins to the steamer tray as you can. Now fill each ramekin with the batter 2/3 full. Cover and steam for 5 minutes. Repeat this process until batter is finished.


Pound the cooked prawns in a mortar and pestle until crushed.


Put a fry pan on low heat, add the crushed prawns, garlic, and shallots, stir fry for 5 minutes or until prawns are completely dry and floss-like texture.
 

Turn off heat, add pepper and continue to stir fry for a further 3 minutes. Add some oil to each rice cake and top with prawns, crushed pork crackling, and fish sauce

read more...

Simple Egg Salad Sandwich


Egg salad is a deli favorite, but it’s easier than you think to make egg salad sandwiches at home. Follow our quick and easy recipe for egg salad sandwiches—this recipe is sure to become an instant classic in your home. Use this egg salad recipe for lunch in a flash, or for a tasty dish everyone will enjoy, mix up a batch and take it along on a picnic or to an outdoor barbecue. Sometimes nothing beats the taste of a classic homemade egg salad sandwich.

Egg Salad Sandwich
Classic egg salad is made with hardboiled eggs, mayo, celery, and mustard. You don’t need to be a culinary expert to make a delicious egg salad. Use your favorite herbs and spices, your favorite brand of mayo (or try making your own!) and good sandwich bread. Give the traditional egg salad recipe below a try and then mix it up and put your own spin on an egg salad recipe.

Simple, easy, and tastes great. Cook time is for the eggs. Great for lunches, picnics, cook outs, snacks, finger foods, etc.

6 large eggs
1-2 tablespoons mayonnaise (or Greek yogurt)
Salt and pepper
A tiny squeeze of lemon juice
2 stalks celery, washed and chopped
1/2 bunch chives, chopped
2 small handfuls of lettuce
8 slices of whole grain bread, toasted

Directions:

Place the eggs in a pot and cover with cold water by a 1/2-inch or so. Bring to a gentle boil. Now turn off the heat, cover, and let sit for exactly seven minutes. Have a big bowl of ice water ready and when the eggs are done cooking place them in the ice bath for three minutes or so - long enough to stop the cooking. Crack and peel each egg,dicing all the eggs. add about three tablespoons of mayonnaise (home made if you can) and one tablespoon of mustard


Mix it all together, and check if it’s tangy enough.. If you need to add a bit more mayo to moisten up the mixture a bit, go for it a bit at a time. Stir in the celery and chives. Taste, and adjust the seasoning - adding more salt and pepper if needed.


The dainty way to serve this is to put a scoop of it on a lettuce leaf. Iceberg, of course.


On some sourdough bread with the lettuce leaf. And a slice of white American cheese, if you’ve got it. And that’s it.

People used to eat food they liked, not food that was impressive or that happened to be fashionable. And an egg salad sandwich is about as unfashionable as you can get   
ENJOY

read more...

Sushi


  Sushi is a roll of fish/sea food with rice wrapped in nori (seaweed).
   Many people love sushi, but think it can only be procured outside the home. However, it is easy to make Sushi at home. I was amazed at how easy and inexpensive it is to make homemade sushi that is just like the kind served in restaurants. Then, I will give a simple guide to making sushi in your kitchen!

Ingredients


  • Vegetables
  • Fish, shellfish or other topping
  • Rice wine vinegar
  • Sushi rice
  • Unsalted dried seaweed (layer sheets prepared for making sushi)
  • Sugar
  • Salt
Optional condiments:
  • Wasabi
  • Pickled ginger
  • Soy sauce
Derection:

Step1:
Place about 2 cups of sushi rice in a rice cooker and then rinse the rice repeatedly until the rice water is not cloudy. Then fill the rice pot with new water (how much water depends on the amount of rice of the cooker and the same goes for how long to cook it; the instructions are usually in the box).

Step 2:
Wash the veggies and place them on a cutting board and cut the carrots in half long wise and then cut them into long skinny strips. Repeat on the cucumber.


Step 3:
Cut the crab into little strips and make sure they are pretty even in length.


Step 4:
Check on your rice. If it's ready, take it out and put it in a dish.


Step 5 :

Place a sheet of nori (found at well-stocked super markets) shiny-side down on a bamboo rolling mat. Spread 1/2 cup sushi rice over half the sheet; firmly press rice along the edges.


Step 6 :

Arrange ingredients of your choice about 1 inch from the bottom of the rice. Think about colors and  flavors as you choose your fillings.


Step 7 :

Roll up the maki tightly, leaving the last inch of the nori sheet exposed. Dip your fingertips into a bowl of water and wet the last inch of the nori, then finish rolling it closed.
 

Step 8

Roll the bamboo mat over the maki roll. Pinch the mat to form the maki into an even cylinder. Before cutting, dip the tip of a chef’s knife in water and tilt it up to let water roll down the blade.


Step 9:
Cut down the middle of the roll, take each half and place them parallel to each other. Repeat by cutting both halves down the middle simultaneously, take those portions and repeat one last time. This cutting technique insures that the ingredients do not spill out of the roll
 
read more...